
Background
I stumbled upon my old portrait from my birthday somewhen between 2005-2010. I was surprised to see how much I have changed since then, physically and mentally (I hope).
I realized that there was an opportunity to restore the image, as I saw some artifacts on the image. These artifacts have a repeating pattern which I think with a little bit of science they can be removed. Being an engineering student, I thought it would be interesting to try to restore the image using image processing and machine learning.
Process Overview
There are some things that I did to restore this image.
- Adjusting the image
- Cleaning the image
- Restoring the image
- Final readjustments
Adjusting the Image
This step will be done across all the steps if needed.
Here is what the image looked like.
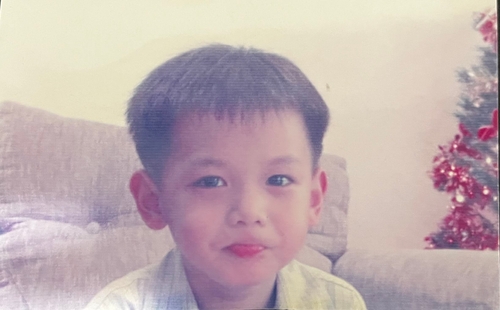
The colors and contrast were off when I took a photo of the image. Having some knowledge in using Adobe Photoshop, I tried to adjust the image using the software. With my limited skills, I tried to adjust the image to make the colors more natural to today's standard.
If you are curious of what I did, this is what I did roughly:
- Adjusted the brightness and contrast of the image.
- Used the Camera Raw Filter.
- Removed other artifacts.
You might be wondering of these questions:
Why not directly remove the artifacts?
Why not directly restore the image using the model?
I have done some experimentation and for my case, it works better after the image is adjusted so it can preserve the details of the image better. I also tried to restore the image directly using the model, but the result is not as good as the one after the image is adjusted.
This is how the adjusted image looked like.

Cleaning the Image
If you are here for the machine learning part, you can skip this section.
The artifacts that exists on the image are a repeating pattern since it is printed on a jammed printer back then. After attending an image processing class, I realized that I can use a low-pass filter to remove the artifacts.
Utilizing an online tool, I converted my image to the frequency domain using Fast Fourier Transform. This results in a 2D array of complex numbers, which represents the image in the frequency domain. The numbers are made to be a scalar value by taking the absolute value of the complex numbers so it can be visualized. This is how the image is represented in the frequency domain for visualization.
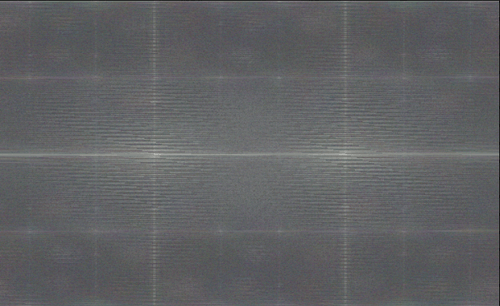
As you can see, there are some light points that are visible in the frequency domain. Repeating patterns in the spatial domain will be visible as light points other than the center in the frequency domain. This is because the repeating pattern has a high frequency, which is represented as a light point in the frequency domain.
Because of this reason we can use a low-pass filter to remove the repeating pattern. We simply set the values of the light points to 0, which will remove the repeating pattern.
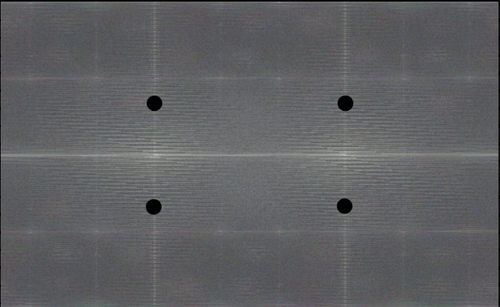
If you noticed, I didn't remove all the light points on the image. After experimentation, those particular points are the one that are causing most of the fuzzyness. Removing additional points caused the image to revoke its details.
After that, we can convert the image back to the spatial domain using Inverse Fast Fourier Transform.
Here's the result after undergoing the process thus far.

Albeit looking very similar, we can observe that the repeating pattern is gone (or at least, smoothen) for notable parts of the image.
I was quite satisfied with the result (and I get to use my engineering degree as a bonus 😝), so I decided to move on to the next step.
Restoring the Image
Fun Fact: I did this step after a few weeks of cleaning and adjusting the image since I just found out about this machine learning model 😅
On serendipity, I found a video on YouTube by Two Minute Papers that showcases a machine learning model for restoring old portraits. You can check out the video below:
The machine learning model is called "CodeFormer" and is available on Replicate for public use.
This model is trained to restore old portraits and works well for my case and other images that I have tested, although there are some drawbacks that I encountered. These observations will be discussed in a later section.
There are one notable parameter in this model, which is termed codeformer_fidelity.
This parameter is a value bounded between 0 and 1 (), which signifies a measure between quality and fidelity.
The lower the number, the more of the original features of the image are preserved.
Conversely, the higher the number, the more the model will try to restore the image which in turn may remove some original quality of the image.
Based on that information, I tried to balance between the two values and found that the value of works best for my case (if I recall correctly). This number should be adjusted according to your use, so feel free to experiment with it. If you feel that the result is too unrealistic or different with what you look like, try to lower the value.
Using my cleaned image, I ran the model on it and did some adjustments to the result. Here is the result after the process.
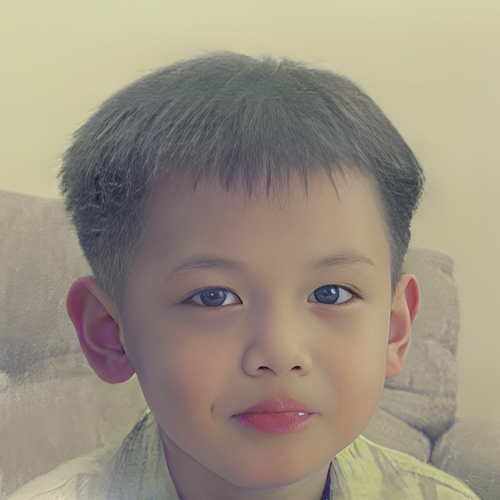
I was blown away by the result as it was very close to how I looked (at least based on my memories) 🤯
Takeaways
Spatial and Frequency Domain
Not all light points of the frequency domain are "bad". Some light points are needed to preserve the details of the image. Removing all the light points will result in a blurrier image. After experimentation, in my case those four points were the one causing the fuzzyness.
I did the adjustments before doing the repeating pattern removal because the result was better. I am not really sure why, but I tried to make the contrast clearer between the repeating pattern and the original image. The result is what you are seeing in this blog.
CodeFormer
The model works well for my case and I found some observations.
I tried this model to restore other images and found that the result is not as good as the one for my case. It has difficulties detecting the faces and the result sometimes is odd. I think this is because the model is trained on a specific dataset, which is old portraits. My photos are not specifically old portraits, rather they are just old photos with artifacts.
Here are some other points that I observed:
- The model works best for fixing close up photos.
- The model works for photos with multiple people
- The model works not that great against photos with a lot of artifacts, noise, and blur.
- The clearer the photo features, the better the result.
- Higher pixel count does not necessarily mean better result.
- Try to balance between quality and fidelity/faithfulness.